Using The Wonderful Quarter Planner
It is possible to use only the quarter planners to plan all of the classes for a school year. Each separate class that lasts the entire school year would require 4 quarter planners printed on both sides of 2 sheets of paper. If the class lasts for one semester print 2 quarter planners on both sides of 1 sheet of paper. This is for one child. Each child should have his own set of quarter planners.
Quarter planners have a great advantage over weekly planners. If your child lags behind on a subject the plans of the other subjects will not be affected because the plans for other subjects are on a different sheet of paper. The big disadvantage of quarter planners is that they cause a lot of page turning in your notebook. You flip to the math section, then you check the science section, etc...all day long. I have made a checklist page to help with that problem. The checklist helps when you want to check-off the subjects that have been done. At a glance you can see what the kids need to do then you can go to the correct section in your notebook for the assignments. It also helps when they are clamoring, "What's next or What else?!" and you can look at your checklist and tell them without having to flip through your notebook.
The Notebook
Basic:
Make a divider for each subject and place them in your notebook. Place the necessary amount (read above) of quarter planners between the dividers. I have two children so I put my older child's quarter planners first and the younger child's planners second within each of the dividers. It helps to use different colored paper for each child.
Nice Extras:
For each subject print 2 journal pages on both sides of a sheet of paper. If you have 3 or more children print extra journal sheets. This is to be used for making notes to yourself concerning your child and how he/she is doing on a subject. You can use the journal sheets to describe field trips or what-not.
Print a school year calendar and a 2 page events planner to place in the front of your notebook.
Print a check list for each child to place behind the calendar. This is a necessity when you use quarter planners!
If you must keep up with the days that your child is schooled, print an attendance chart for each one of your children. The chart has 180 squares. For each "school" day write the date in one of the squares. Place this behind the check-off list.
Insert each child's Course of Study next.
Insert Each child's Goal Sheets next.
For yourself, print several journal sheets. Use them to make planning notes, home school notes, library books check-out list, what's for dinner list, etc......
Finally, you may wish to print a reading list page for each child. You can either put the lists behind your journal sheets or in the Reading Class part of your notebook.
Organizing the Subjects:
It is a good idea to use dividers between each subject in your quarter planner notebook.
How to use the Quarter Planner
Depending on what subject you are planning, you can fill a quarter planner out completely, a day at a time, or a week or two in advance. That's not all... you can use a quarter planner to write a series of lesson plans to plan an entire book or to troubleshoot a problem area that your child needs extra practice with. I use quarter planners in all the ways mentioned above.
Planning Entire Book
When I get my books in the mail, I make a lesson series on a quarter planner or a semester planner. Many times, I make a copy of the planner and glue it inside the front cover of the book. I have several examples of lesson series on this website, but basically, a series is this: Divide the book into daily portions and record the page numbers in sequence on the planner. Series completely ignore days and dates.
Setting up the Quarter Planner
I have information about planning in greater detail at these links, Beginners Planning and Scheduling Tips. The quarter planner is made up of 9 rows of 5 blocks wide. It can represent a 9 week chunk of the school year for one subject. You should write the subject such as Algebra or Spelling on the subject line. At the bottom of the paper, write the books that you will be using and assign each book an easy to remember key. If you are using just one book the key is unnecessary. Do not write days or dates on the planner. The whole point is to have your plans, but not pin them to a date that later might change - That is the problem with weekly planners - dates.
Thinking About How it Works -Pausing for review or sick days or missed days
Subjects like math, which may require review, can be "paused' with the quarter planner; don't do the next lesson until the student can move forward. If your child misses a day(s) on his/her lesson series don't worry, just pick up where you left off.
If the subject is to be worked on twice a week and you are keeping the dates "true" on the planner, fill out two of the blocks in each row. One row would count for one week. This seems like a waste of paper, but I can see that during the busy homeschool season, the visual reminder would be helpful.
If You Plan a Little at a Time: Science
For my son's science class, which he does every day, I plan one or two weeks at a time. Since he does science every day, I fill every block in the row with the page numbers, and instructions. He is using only one book for science this year so I write the name of the book on the bottom of the planner (and no where else). His science is physical science and I will write that on the subject line.
My daughter, who at this time does not do science every day, gets her planner filled out only a week in advance. Most of her quarter planner will be blank since she does science only twice a week. She will be using several books and the names of the books will be assigned keys. The book titles and keys will be written on the bottom of the planner. The keys (along with page numbers) will be used for writing the plans.
If You Plan a Little at a Time: Math
Math is a variable story! If the kids are doing great, then I will plan one week in advance. When the scores start dropping, I stop planning regular math and start planning review.
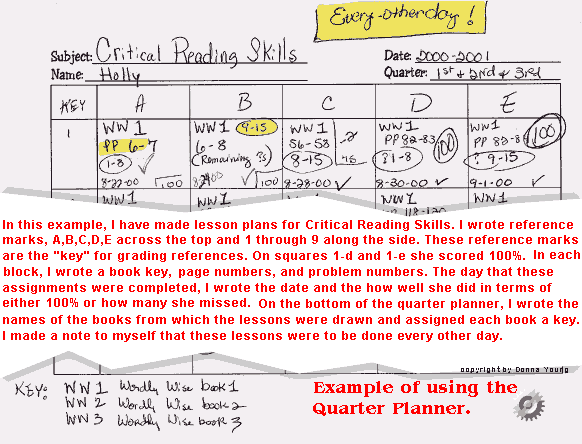
Troubleshooting a Problem Area (A Lesson Series Example)
This year my daughter is getting some extra classes in one of her weak areas. This is easy to plan....here's what I do... I use the quarter planner and I will write an assignment in every block. At the bottom of the planner I will write the book(s) from which the lessons are drawn and give them a key such as "ww1" for Wordly Wise 1. She will, until vast improvement shows, do the extra lesson about every other day. I will date the one that she does and I write a very short evaluation about how she did.
Image of a Lesson Series example

 AOP LifePac Electives Art Plan
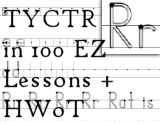 Handwriting W/o Tears
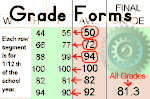 Home Page of my Grade Recording Forms