
Donna Young's Homeschool V-Planner - Data
The Data Sheet in the High School V Planner
High School V Planner News - The High School V Planner is ready for use. The planner may be downloaded from the members area labeled that is labeled "V Planner." I encourage all V Planner users to subscribe to the V Planner Newsletter. That may be done via your Member's home page.
![]() RSS Feed |
RSS Feed | ![]() Member Login
Member Login
The Data sheet is the first sheet that should be filled with information. Almost every sheet in the V-Planner calls for information from Data and that makes the Data sheet very important. The High School V Planner is a 4-year planner and at Data there is a place to fill in information about each of the four years. Your job at Data is to fill in information for the up-coming school year. Of course you can fill in the other years if you choose, and you do not have to do that, but you can and you also have the option of changing it later.
I strongly recommend that all homeschoolers create a four-year plan of study for high school on paper. The plan of study may be entered into the High School V Planner at Data and at Plan, now or as the years pass. See Why at High School Course Checklist.
The First Steps in Filling in Data

Remember - all information entered can be changed later if changes need to be made.
- Enter the information for the Transcript.
- Your first name or a short nickname - This is for the Today sheet, Don't enter your last name, that will make the information too long.
- Your birthday. This is for the Today sheet and does not show up anywhere else in the planner. Enter the month and date is enough. The year does not have to be entered.

- Cell E7 will display the total number of credits from the Plan sheet. The plan sheet is optional, but if you are using course categories, you might as well use the Plan sheet.
- Cell E9 asks for a date. This date is the first day of the 4-year calendar - this is not the school calendar; this is the calendar for the dated events that can be entered at the Calendar sheet. Items in the calendar sheet will show in various places - some school planners, the Today sheet, and the 7-Day sheet. I advise you not to change the date once it is entered. Once dated events are added to the "Calendar", and then the date is changed at Data - those dated events will be on the wrong day - so set it and don't change it.
- E13 - This cell is reserved for the graduation date. The graduation date is used by the transcript.
Next is information on the Grade Scales - the grade scales are displayed and there is a little information about the grade scales. Grade scales may be adjusted later. I have written more about the grade scales at my blog here: ADDLINK
Student Information

There are four places to enter Student Information - one for each school year - This is a four-year planner for one student. Choose the correct place to enter information and add it.
I can see this planner being used starting at 10th or 11th and if that is the case, scroll down and enter data for 10th or 11th, or even 12th - then sometime during the year, enter grade information for 9th and other years that you did not use this planner. This is so that the transcript may be used.
- First date of school
- The grade - enter a shortened ordinal number - 9th or 10th
- Student's last name - this is for the transcripts
- Student's first name
- Student's date of birth - this is for the transcripts
- Planner header title - this shows on some planners, not all, I think.
The other "Student Information" areas will have parts 1-5 "pre-filled". I have estimated starting school dates for years 2-4, however; the pre-filled parts are open for typing and you should overwrite the pre-filled areas with the correct information when you know the correct information.
Each of the Four Student Information Sections Begins at:
- Year 1 (9th) - Row 22
- Year 2 (10th) - Row 55
- Year 3 (11th) - Row 88
- Year 4 (12th) - Row 121
Note - you only need to fill in the current year. Filling in future years can be done, but it is not necessary.
If you want to create a 4-year plan (for reference purposes only) use the Plan sheet. Read about the plan sheet at the blog at Plan Sheet

The next step is part of the Term set-up. It is important, please do not skip it. Set up Grading Terms For "this year", future years do not have to be set up.
- Choose how many grading terms that you need to use. The choices are 2, 3, 4, 5, or 6.
- Choose the term that begins the 2nd semester. This setting affects the S-Sheets that end with the numbers 7, 8, 9, and 10. - Those S Sheets are the ones that may be "split" - more about that below.
- The grading term selection is present for each of the 4 school years, which means that each year can have a different amount of grading terms.
See also the Video: Video - Setting up the Grading Terms. The same video is at my blog: ADDLINK
The Class and Books Area
The image below shows the first 3 rows, each row is for one S-Sheet. This, each row being for one S-Sheet, is true for the first 6 rows. The S-Sheets are linked on the left in each row - pictured are S1, S2, and S3. Similar to these are S4, S5, and S6. These are all "Full Year" S-Sheets and so are S21, S22, S23, S24, S25, S26, and all of the other S-Sheets that end with the numbers 1-6.

At the first 6 rows of the class and book areas, enter the following:
- Formal Class Names - these are the class names that will show on the transcripts, course of study, the course descriptions, and other places in the V Planner
- Credits
- 1 or 2 Main Books - Separate with a comma - shows on each S-sheet, the course descriptions, and the course of study (COS).
- Additional Books - Separate with a comma - these book titles will appear on the course of study and the course descriptions.
- Shorter Class Name for Planners - The shorter name, if entered, will appear on the lesson planners. This is especially useful when the formal class name is longer than your half of pinky finger. Make these names short.
- Course Category - From Lists - Choose a course category. If there is not course category that fits the class, go to the Lists sheet and add it. If you do not want to choose a course category, then do not choose one. However, if you want to write course descriptions, then you must select a course category for each class that you want to describe for documentation.
- Reading List - A reading list - books that either you want your student to read or books that your student has read- the list can be built throughout the year. THIS list will not appear on course descriptions. The reading list will only appear on the Course of Study sheet. It will not appear anywhere else. Only the first 16 titles will appear on the COS. If you want to enter your student's English literature books here, that is okay although doing so will make the books appear twice on the COS, however; if you want the English literature books to show up on the course descriptions, then add them to the Additional Books column.
- Academic of not - This is alast minute addition. The tables are build, but the formulas are not yet made.
The Last Four S-Sheets - Split or Full
The S-Sheets that end with the numbers 7, 8, 9, and 10 can be either split or full. There is a drop-down list to the left that allows you to make a selection.

What the Selections Mean
- Full
- The S-Sheet is used for one subject (course, class) for the whole school year.
Please note that because the s-sheet is a full/split type, the lesson plans will have to be divided between semesters.
-
Split
- Choose split and you can -
- Use the S-Sheet for two different semester-long classes - one for the 1st semester and one for the 2nd semester.
- Use the S-Sheet for one semester-long class in either slot - 1st semester or 2nd semester.
How the semester classes appear on the Transcript:

Donna Young
July 26, 2012
Read about the two different subscriptions available for DonnaYoung.org Some items are available for purchase from the Shopping Cart
Yellow Line Handwriting Paper
 Have you been hankering for printable handwriting paper that features an ultra bright yellow lower rule space? If yes, then this is your lucky day, my friend! If no, move along to a previously listed awesome addition to donnayoung.org.
62 Handwriting Animations
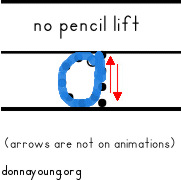 DonnaYoung.org has 62 more manuscript handwriting animations! Wow Donna, you've been productive! Yes, I have been, and you can see them starting here: ZB Handwriting Animations. This set includes both uppercase and lowercase and the letters used resemble Zaner-Bloser.
Grades and Attendance II
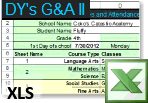 A Completely New, made from scratch Grades and Attendance XLS file! Supports up to 40 classes! Uses Course Types! Made for one student in grades up to 8th.

Copyright © 1999 - 2024 Donna Young, All Rights Reserved
![]() RSS Feed ·
Terms of Use ·
Privacy Policy ·
FAQ's ·
Blog ·
Site Index
RSS Feed ·
Terms of Use ·
Privacy Policy ·
FAQ's ·
Blog ·
Site Index
Subscribe to DonnaYoung.org Update Feed by Email
You are at DonnaYoung.org, online since 1998. Thank you for visiting my website. Donna Young