Sock Doll: Bunny
Written: Nov 29 2006, by Donna YoungI made a sock bunny Tuesday. Sock bunnies are usually okay for small children as long as you embroider the eyes and nose instead of using buttons.
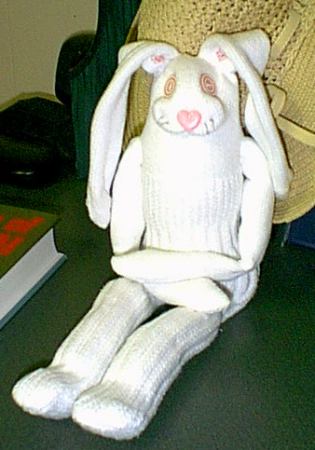
I made this bunny to make use of a pair of men's white knee socks that no person at this house would consent to wear.
Sock dolls are fairly easy to make as long as you have a sewing machine which will do zig-zag. I sewed all of the seams twice with a dense medium zig-zag.
If you want to try making one here is a basic how-to:
Materials
- 1 pair of long men's knee-high white socks (The socks that I used are as long as my arm)
- fiberfill or preferred stuffing
- fabric for bunny clothes
- Optional - plain uncooked rice IF you want to add weight and body to the paws - AND run-free knee-high nylons to make the bags to hold the rice - AND thread to tie off the ends of the bags
Sewing supplies
- sewing machine
- white thread
- hand-sewing needles which can handle thick thread
- thick thread such as white crochet cotton thread or some other strong white thread
Bunny face
- either two pink buttons for the eyes or pink or blue embroidery floss
- a button for the nose or embroidery floss (your choice of color)
- gray embroidery floss for whiskers
- pink embroidery floss for inner ear (optional)
Important Notes
The heel is used for the face
The foot is used for the ears
The cuff is used for the legs
The foot of the other sock is used for the arms
Ears
 Turn one sock inside out and lay it on the table heel side up. Flatten the foot of the sock. Measure the width of the foot (not length). Mark a center line. Sew the ears with a zig-zag stitch around 1/4 inch away from the center line on both sides and across above the heel. Stop just before the beginning of the curve of the heel. See image. I recommend sewing all seams twice. Cut between the two seams.
Do not turn inside out yet.
Legs
 Lay the sock on the table again, heel side up. Flatten the cuff. Measure the remaining sock. Allow 1/2 of the remaining sock for the body and 1/2 for the legs. Measure across the cuff and draw a line down the center of the cuff. Sew 1/4 inch away from this line, but do not sew across the line. Cut on the center line between the two lines of sewing and just past the sewn part about 1/2 inch. This leaves the crotch open for turning.
Turn the bunny, ears and legs, right-side out through the crotch.
Finishing Ears
Step 1 With your fingers, roll out the seams in the ears.
 This step is optional Thread a needle with 3 strands of pink embroidery floss and make several arches of backstitches near the base of the ears. Start the stitching at around 3/4 of an inch above the base, place the knot at the base. I stitched 4 arched rows. The purpose of this step is to give the illusion of pinkness of the bunny ear. You can see the pinkness in the photograph above.
 Step 3
Thread a needle with heavy white thread. Pinch the fabric at the base of the ear, drawing together around 3/8 inch from either side of the center, this covers the knot from the previous step. Stitch closed. With the same thread, stitch back and forth through the base of the bunny ear. The purpose of this is to close the base of the ear and keep fiber-fill out of the ear.
Before Stuffing - Homemade Bags for Rice
If you are not weighing the feet, then skip this part. Before you decide to use rice in this bunny please consider these two potential problems:
- The weighted paws turns the bunny into a minor weapon. You have been warned.

- Rice-weighted paws are not washable - Use beads or poly beads instead if you think the bunny will get wet or will require washing.
The bags are made from parts of a nylon- this could be a knee-high that is damaged at the toe, but not nylons that have a run. The rice will leek through a run. Cut two 4-inch long tubes from the knee-high(s). Tie one end off securely with thread. Add the amount of rice that you want, perhaps 2 tablespoons to start with. Temporarily tie off the other end of the bag with a rubber band or a wire-twist. Place the rice bag in one of the bunny's feet and see if the quantity is right, if not, remove the bag and adjust. Do this for each foot. When you are happy with the amount of rice in each bag, tie them off securely and place them in the feet before stuffing.
Stuffing
I used a bit of rice in small homemade bags in the bunny pictured above, but I do not recommend using rice in a doll that is meant to be played with! Use the polyfill and stuff the doll's head and body as tightly as you like. Stuff the legs. If you want the bunny to sit, don't stuff all the way to the top of the thighs. A few well placed hidden stitches can keep the stuffing out of the upper legs of the bunny. In the same way, the rice bags, if you used them, could be secured from shifting with a few well placed stitches. Inspect the bunny, have it sit, is it floppy enough? Is it soft enough? etc.. When you are satisfied with the stuffing, thread a needle with some heavy white thread and sew the crotch closed.
Shaping the Face
This step requires soft sculpture technique.
How this part turns out will vary. Your bunny may not look like my bunny.
First, thread your needle with the heavy white thread. Look at the heel of the sock which you are about to transform into a face. Imagine first where the nose should go, keep that thought. The eyes should go halfway between the nose and the base of the ears.
Pinch in the imaginary spot where the eyes will go. If that looks right to you, go ahead and sew all the way through the layers from one imaginary eye to the other.  Pull on the thread a bit, but not too much! Pull on the thread enough to cause some indention for the two eyes. When you are satisfied with the amount of indention.. tie off the thread and cut it.
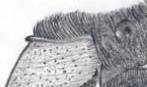
Next you will form the mouth. First sew a short running stitch (around 1/2 inch) from the point which is the imaginary nose downward (see image). Tug the thread just a bit to shorten this area. Tie off thread, but do not cut the thread.
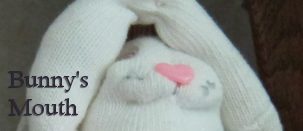
Look at the image. Imagine the lines of the mouth. Along the imaginary mouth line, sew from the mouth to the eye pulling the thread enough to cause the mouth to take shape. Go back and forth from the eye to the mouth at different points of the mouth (along that imaginary line). Do this sewing/shaping on both sides of the mouth. When you are happy with the mouth, tie off the thread.
Adding Eyes, Nose, Whiskers
If you are using buttons for the eyes, sew them securely at the proper places. If you are embroidering the eyes, embroider them in any way you wish. The same goes for the nose. Apply a button or embroider the nose. Add whiskers with the gray embroidery thread. 2 to 4 is enough. The whiskers can be French knots, a knotted clipping of thread, or just a spot of color. I used a knotted clipping of embroidery thread.
Adding the Arms
 Make the arms from the foot of the other sock. Cut the foot off the sock and flatten it. Sew with a zigzag stitch around 1 1/4 of an inch from both sides of the foot. Cut between the two rows of stitching and turn the arms right-side out. Roll down the raw edges to the inside of the arms. Hold one of the arms up to the "shoulder" of the bunny. How long is it? The arm should go no longer than to the knee of the bunny. If the arm is too long, roll more of the raw edge under. Add a little stuffing to the paws. (I used rice, but I do not recommend rice for a doll which will be played with.) Sew a few stitches across the elbow area to keep the stuffing (or rice) in the paws and so that the arms will bend. Add a little stuffing to the top of the arm.
  Thread your needle with the white heavy thread and sew the arms to the bunny in the place that looks about right. The right place is directly under, in a straight line, beneath the ears and around 1/2 - 3/4 of an inch under , in a straight line across from the chin. See image. Sew the arm on firmly and tie off the thread. Do the same to the other arm.
At this point you are finished with the doll. All that has to be done now is sewing an outfit of clothes for it. I haven't made clothes for mine yet, but I am currently thinking it is a boy bunny and will have a tan shirt, navy pants and a patchwork jacket or vest.
 Other Crafts at Donna Young.org
Paper Crafts
Crafts: Ornaments
- Styrofoam Balls and Buttons Ornament
- Beaded Icicle Ornaments
- Bear-in-a-Bag Christmas Ornament
- Lollipop Tree Ornaments
- Pipe-Cleaner Candy Canes Ornament
 Blank top papers with two "Blank-Top" sizes - regular and tall.