Bear-in-a-Bag Christmas Ornament
Written: Nov 28 2006, 11:26 AM, by Donna YoungMaterials
 Scraps of Christmas print fabrics (to make bag,
see size below)
Scraps of Christmas print fabrics (to make bag,
see size below)
Red Six-Strand embroidery floss (to hang bag on tree)
Red
cording (2mm thick) or thin ribbon (for bag cord)
White
glue
scissors
sewing needle
sewing thread in colors to match Christmas
print fabrics
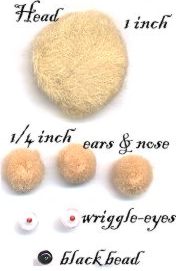
Package of Tan 1 inch pom-poms (for head)
Package of Tan 1/2
inch pom-poms (for paws)
Package of Tan 1/4 inch pom-poms (for ears)
1/8th
inch wriggle-eyes
black beads (for tip of nose)
poly-fill stuffing or
quilt-batting scraps (to stuff into the bag)
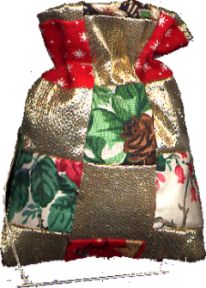
The Bag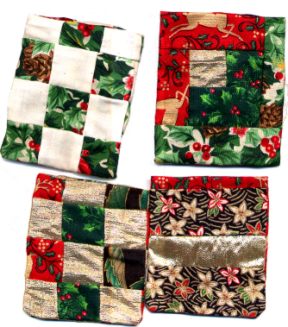
The bag can be made from a solid piece of fabric or it can be made from pieced fabric. Either way-- the final piece of fabric that is cut for the bag should measure -- between 5 1/2 - 6 inches wide and 5 1/2 inches long.
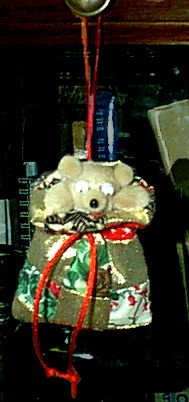
In the image to the right, you can see some of my bags. They are not of uniform size, the size depended on the scraps I sewed together. Some of the bags were 6 1/2 inches wide and some were the size specified above.
Fold the fabric in half and sew the bottom and the side. The seams should be 1/4 of an inch wide.Turn right-side out. Fold around 1 1/2 inch of the top edge to the inside of the bag.
Add a little stuffing to your bag. The bag should not be stuffed full. The bag should have enough stuffing to cause it to puff out just a little.
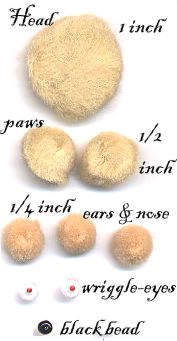
Making the Head
For each head use
1-1 inch pom-pom
3-1/4 inch pom-poms
2
wriggle eyes
1 black bead
white glue
Follow these steps:
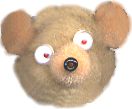
Glue a 1/4 inch pom-pom to the 1 inch
pom-pom.
Glue the two wriggle eyes against the nose at around 10 O'clock and
2 O'clock.
Glue two 1/4 inch pom-poms to the "top of the bear's head", in an
imaginary line from his nose through his eye (at around 10'o'clock and 2'o'clock
also).
Glue a bead to the top of the bear's nose.
Let all that dry
TIP:
Use tweezers to place the nose bead and the wriggle
eyes
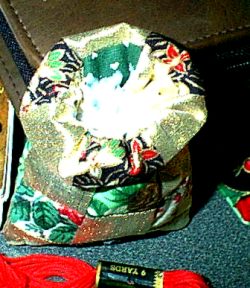
Gathering the Top of the Bag
 :
:
Take up the bag again and with the sewing needle and
matching thread, sew running stitches all around the bag about 3/4 inch down
from the top of the bag. ->Start the stitching at the back of the bag and end
the stitching at the back of the bag. Pull the thread to gather the bag
slightly. There should be an opening in the bag that is a bit over 1 inch wide
at the gathered part.
Tie the thread, but do not cut it yet, leave it hanging
for now.
Adding the bear to the bag
Fold the top of the bag down and fill the area with white
glue.
Add the bear head to the middle of the bag. Make sure it is touching
the glue, if not either add more poly-fill and more glue or just add more
glue.
On each side of the bag, where the paws will go, add a dot of glue. The
glue should be on both the bag and the bear head.
Place a 1/2 inch pom-pom
next to each side of the bear head on the glue.
How's it looking so
far?
Pick up the dangling needle and thread and run it from back to front
through the bottom of the bear head. Tie the thread off, but do not cut it
yet.
Adding the Hanging Loop and the Decorative Cording
Cut a 14 inch piece of embroidery floss
and wrap it around the gathered portion of the bag. Tie it off at the BACK of
the bag. Bring the ends together and tie them together in a knot. This makes the
loop to hang the bear.
With the dangling needle and thread, take one little
stitch over the embroidery floss to make it stay put at the front of the bag. Do
not cut the thread yet.
Cut an 8 inch piece of cording. Knot each end of the
cording and add a little glue to each knot to make it stay knotted. Fold the
cording in half. Place the cording on the middle of the gathered front of the
bag. With the dangling needle and thread, sew the cording to the bag. Tie off
the sewing thread and cut it.
You are finished.
If you wish to further
spruce up the bear, cut tiny bear pads out of black or brown felt and glue them
to his paws.
 Other Crafts at Donna Young.org
Paper Crafts
Crafts: Ornaments
- Styrofoam Balls and Buttons Ornament
- Beaded Icicle Ornaments
- Bear-in-a-Bag Christmas Ornament
- Lollipop Tree Ornaments
- Pipe-Cleaner Candy Canes Ornament