How to Make a Sticker Book
During our early homeschooling years when my two children were young, I made each one a sticker book. The younger child went through two sticker books before she outgrew them.
I am more of a positive reinforcement kind of person and I used the sticker books to encourage my children. They could choose a new sticker for their book under certain circumstances. Of course this meant that I had to seek and purchase nice stickers and that was not always an easy task.
I should add that my children did not beg to add more stickers nor did they become obsessed with the stickers. If they had they become so, I would have dropped this type of reinforcement because the positive effect would have vanished. The sticker book did not exist to force good work and, I, as the keeper of the stickers, would have surely refused to be placed in the role of a twisted dungeon master of captive stickers. It's just stickers.
Shown Below, Books Made with the Second Method
On this page I will describe three methods to make the sticker book. Each step is progressively more involved.
- The first method is very basic.
- The second method is like the first except contact paper and the use of a word processor is brought up as an option.
- The third method is layered paper with cut-outs that requires the use of contact paper.
Materials for 22-Page Sticker Book
![]() 3 sheets of paper - (I used color paper)
3 sheets of paper - (I used color paper)
![]() Contact paper (optional for methods 1 & 2, required for method 3)
Contact paper (optional for methods 1 & 2, required for method 3)
![]() Staples, or other means of binding the pages
Staples, or other means of binding the pages
![]() Scissors
Scissors
Instructions
Method One- Personalizing After Assembling Book
Method Two- Personalizing before Cutting and Assembling Book
Method Three- Cut and Layered Paper
Method One- Personalizing After Assembling Book
(not using contact paper)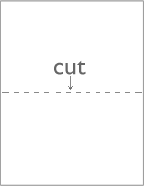 1. Cut each of the 3-sheets of paper in half.
2. Stack the 6 halves.
3. Staple along where the center fold would be.
4. You or your child should write his or her name (and year) on the cover.
 Method Two- Personalizing before Cutting and Assembling Book
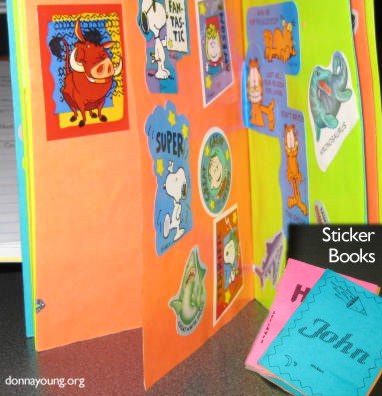
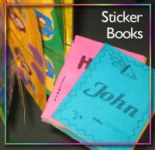
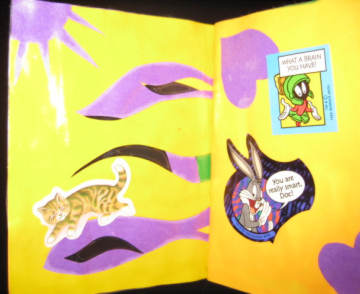
I always used contact paper for these books but using it is optional. The small photo on the left shows three of our sticker books. The blue and pink ones were made with method two. The colorful book in the background was made with method three.
-
Choose three sheets of paper to use for each book.
-
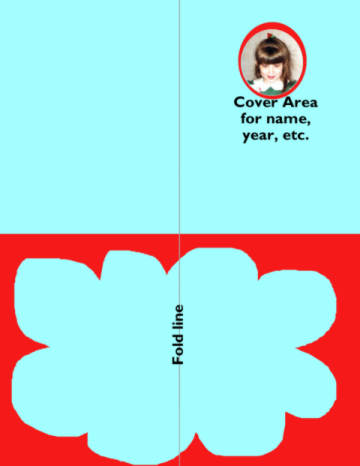
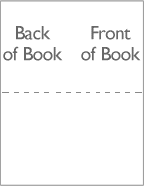 On one of the three sheets of paper in the upper right quarter, write the child's name and year.
OR A word processor can be used to add the name and year. If using a word processor, take the opportunity to decorate the cover with clip art or with a digitized drawing made by the child, or the child's photograph. It is very important to note that the front cover is on the upper right quarter of the paper. See the image to the right. If you want to add clip-art to the other papers, do so at this time. -
Once you have written, drawn, or printed everything that you intend to add to the paper, go to the next step.
-
(optional) Cover the front and back of the 3 papers with contact paper.
-
Cut each sheet of paper in half.
-
Stack the 6 halves
-
Staple along where the center fold would be.
 Method Three- Cut and Layered Paper
Must use Contact Paper
This method is a little harder to explain. Please look at the pictures to get a better idea of the cut and layered method.
To make a cut and layered sticker book you will need several sheets of colored paper. The amount of sheets that you need are determined by how you decide to go about making the pages and if you decide to make this a 22-page booklet or a 14-page booklet. When deciding how many pages to make the booklet, keep in mind that the layered pages are thicker and this relates to your stapler and how much it can handle. The staples will need to be firmly in place and safe for little fingers.
The 22-page sticker book uses 3-sheets of finished cut and layered paper.
The 14-page sticker book uses 2 sheets of finished cut and layered paper.
To make this type of sticker book, cut some of the papers in half and use those for the top layers. If your children like cutting paper, you could allow them to make the top layers out of the half-sheets.
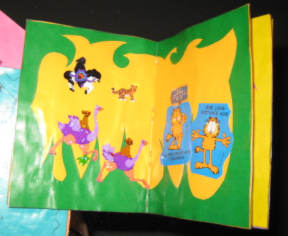
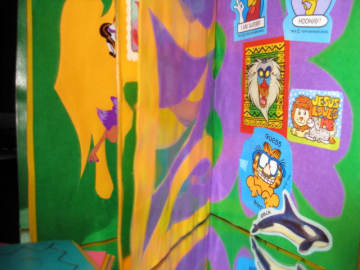
This image shows a cut and layered page that has see-through parts. The dark parts on the left-hand side are transparent. This is done by layering cut papers instead of layering over whole papers. The contact paper secures this type and the other types of cut and layered pages.
When making the cut and layered papers, remember to make the cover page.
Making the Layered Book
To assemble a cut and layered sticker book, arrange the cut layers over whole sheets of paper (unless you make a page with transparent parts). You can secure the cut layers with a little glue, the entire layer does not need to be glued. Cover both sides of each sheet of paper with contact paper.
When the layered pages are covered with contact paper follow the steps for putting the pages together:
1. Cut the pages in half
2. Stack the pages
3. Staple along the center fold
Donna Young
Updated: August 27, 2013
Hello Visitor!
I am currently working on this website to add to its ginormousness. Thank you for visiting, and please subscribe yearly to access my many printable files! Donna Young
May 13, 2021
 Home Page of my Grade Recording Forms
 Macaroni Turkey
 Coordinate Grid Paper