A Memory3
 A memory cube is a project in which one places 6 photographs on a cube. The cube can be made of wood, but in the case of this particular memory cube, the cube is a piece of card stock paper that has the photos printed on it and then folded into a cube shape. The templates for this project are at Cube Templates. This page tells how to work with the pictures and highlights some important points about the picture's size and tone.
Working with the Cube Pictures
How to Add Pictures to the Cube & How to Adjust the Pictures
The images below were made while using Microsoft Word 2007.
Step One - Prepare your Photos/Pictures
 See Also: The Gift Michelle Made
It is ideal if the photos are square. Photos do not emerge from any camera with a square shape, so that means that you will have to edit each one to make it square.
Tip: Place a copy of all of the pictures that you intend to use in a new folder.
Square Picture - How to make a picture square is beyond the scope of this article, so I will not tell you specifically how to make the pictures square, but basically they should be opened in an image editing program and cropped to a square size. Alternately, starting with Word 2007, pictures may be cropped within the program under, Picture Tools, a selection that appears in the menu when an image in the Word document is selected or from the size window. I must warn you that the crop feature is an awkward tool, but it works, and if you mess up, reset the picture.

Note: For better control of the crop tool (as opposed to using the drag handles), access it from the Size Window.
Step Two - Remove Text from Cells Meant for the Pictures
First take mental note of the text in the cells that are meant for pictures. Those cells will say how large the largest side of the picture should measure after being placed in the cell and if it should be rotated. If the picture should not be rotated, then rotation will not be mentioned. For the Memory Photo Cube, only the top picture should be rotated 180 degrees.

Step Three - Adding Images
The image below shows a picture being dragged into the table cell. This is my preferred way to add pictures, but it is not the only way.
Dragging a Picture into the Cells
Open the folder that contains the pictures that you have gathered for this project. Change the folder window to use less than half of your desktop space. Minimize Word and resize its window so that it takes up part of your desktop space. Place the two windows - Word and the Folder side by side. Select a picture from the folder, hold the mouse button down and drag it into the cell of your choice in the cube template in Word. Let go of the mouse button. Be sure to watch the table size when you add the picture. If the table shifted in any way, then the picture will have to be resized. Resizing is described below.

![]() When the picture is "at" the cell, the cursor bar will change from a solid line to a dotted line as shown here in the image to the left.
When the picture is "at" the cell, the cursor bar will change from a solid line to a dotted line as shown here in the image to the left.
Adding a Picture from the Menu
Another way to add pictures, and probably the most used method of inserting pictures is to add them from the menu.
Click in one of the cells.
In the menu at Insert, click on Picture.
Find the picture and double-click on it.
Resizing, Rotating, Formatting the Image
 Right-click any picture to access the menu from which the Size and Format Picture windows can be selected.
The table has a setting that should force the picture to resize themselves, however; that might not happen every time and it will not happen perfectly because if a picture is a rectangle one side will measure to the correct size while the other side could be too large. Notice the table as pictures are added -> If the table shifts in size when a picture is added, then go to the Size window and reduce the size of the picture so that the larger size is equal to the suggested picture size. For instance, if your pictures are rectangles, it will have two sizes - width and length - the larger size should be equal to the recommended size while the other size will be smaller.
Note: Do not uncheck the aspect ratio box because that will mess up image ratio. The exception to this is - It might be okay to uncheck the ratio box if the image dimensions are not exact, yet close.
The Following Example is of a Rectangular Picture in the 1.5" Cube Template
I dropped a rectangular picture into the 1.5" cube template. The picture resized itself to 2" x 1.5". Note that while one side measures 1.5" the other size is too big. This will not work. The LARGEST size must match the recommended size and for this cube that is 1.5", so the picture must be sized down.

The picture shown in the image below has been resized, but because it is a rectangle, it leaves "white-space" on both sides of the picture. If you do not like this white-space, the cell background can be given a color or a better solution would be to crop the picture to a square size. The next image will show the result of cropping with Word's Crop tool in an effort to make this picture square.

The picture has been cropped using the crop tool from the size window. As shown in the image below, the picture now fills the space. To use the crop tool, one must guess at a number and enter it into the right places. In the case of this picture, I wanted to crop some off of both the top and the bottom. After several guesses, I finally picked the right numbers to crop this picture to a square size.
Using the Crop Tool from the Size Window

If the picture needs to be rotated, do so from the Size window, pictured below.

Formatting the Picture - Recolor
Picture may be recolored. I do not remember if this feature is present in earlier versions of word, but it is present in Word 2007. To recolor an image, right-click the picture and choose Format Picture. Select the Recolor box and then try some of the colors. The one pictured below is gray-scale, which is the first selection listed under Color Mode.

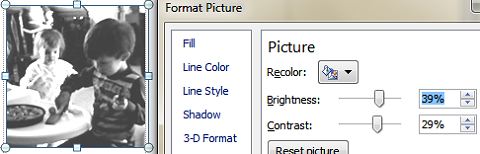
Formatting the Picture - Brightness and Contrast
Adjusting Brightness and Contrast: This step is very important and this feature is present in both newer and older versions of Microsoft Word. Many times, a photograph will be too dark for printing and in this step you will attempt to fix the picture's tone with these settings. The brightness setting will make the image brighter overall, but it can also wash out the picture. The contrast setting can offset the washed out effect by causing darker areas to be darker and the lighter areas to be lighter - hence the word, contrast.

The brightness and contrast settings will vary from picture to picture. Watch the areas in the picture that matter most, the faces in this case, and adjust until those parts are not as muddy as they were originally.
Do these steps - add pictures, edit pictures, format pictures until all 6 squares are filled. Optionally, one square can be reserved for text where you can write a small descriptive bit about the cube.
If this is your first cube, test print on regular paper to see how the pictures look. If you are satisfied, then print on card stock, otherwise, make adjustments.
Next: Pre-folding & Cutting
The How-To Make the Cube Pages
- Cube Templates
- Working with the Cube Pictures - How to Add Pictures to the Cube and How to Adjust the Pictures You are here.
- Pre-folding and How to Cut the Cube
- How to Fold the Cube
PDF Cube Templates: My old cube template is listed at this page Homeschool > Games. I used to use it to make special dice for games.
Credit: This cube project was inspired by this link and a couple of friends that wanted to make the cube. There's more, but the rest is not my story to tell.
Donna Young
December 08, 2012
Other Crafts at Donna Young.org
Paper Crafts
Crafts: Ornaments
- Styrofoam Balls and Buttons Ornament
- Beaded Icicle Ornaments
- Bear-in-a-Bag Christmas Ornament
- Lollipop Tree Ornaments
- Pipe-Cleaner Candy Canes Ornament
Handcrafted Items
Educational Resources for Younger Children at DY
Calendar Related
 Undated Dated Blank Calendars
Each month in this year-long calendar has the right amount of "days." Add the dates in the bordered blocks and decorate the calendar.
 The Half-Size Dated Block Planner
 Handwriting W/o Tears