
Garden Planning and Planting

Garden Planning and Planting
Over the past few days, I have managed to get my backyard vegetable garden tilled and planted. My garden plant-able area measures 21 feet by 50 feet this year. The garden is a few feet behind my house.
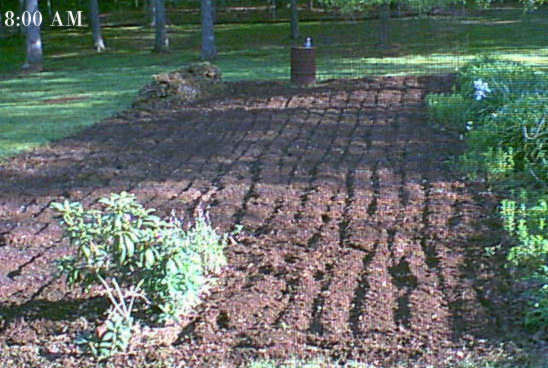
I tilled it April 30th and this is how it looked the next morning.
This year I am planting:
- 5 tomato plants
- 2 cherry tomato plants
- 1 part-row of beans
- 1 part-row of okra
- lettuce
- 3+ pepper plants
- various herbs for seasoning and teas
- zinnias
- sunflowers -if I have room
These choices are based upon what we use or like most.
I am a little rusty with garden planning, but since I am planting more than usual, I had to make a rough outline of what could go where in the garden. Many years ago, I planted more than this with the intensive gardening method of raised beds. This year I am using standard plant rows.
The garden is 21 feet wide, so I will have 4 rows. That is the plan in its most basic form. I couldn't find my graph paper pad so I printed a sheet of graph paper from my math paper web page. I used the 45 x 60 so one cube on the paper could equal a square foot of garden. (Tip: Print in the lowest quality draft so the lines will be gray instead of black.)

On the paper, I decided which row to plant the major plant groups. That is about it. Then I went outside to plant.
Today, this is what I have.
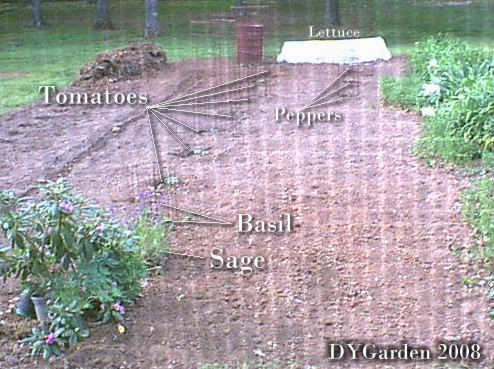
This image shows the 7 tomato plants, 3 peppers, basil and sage. The sage was already in the ground. The rest of the row in front of the peppers is unplanted. I will add more pepper plants there and herbs or flowers.
The white thing in the back of the garden is a floating row cover. I placed it over the lettuce bed. The floating row cover is old, I bought it over a decade ago. It is very light and thin, rain can go through it. I have it supported with hoops made from 4 young tree trunks that I cut out of the woods. It is used to keep pests off plants that do not need to be pollinated.
In the west corner of the garden I have my seed nursery and the okra and bean rows marked.
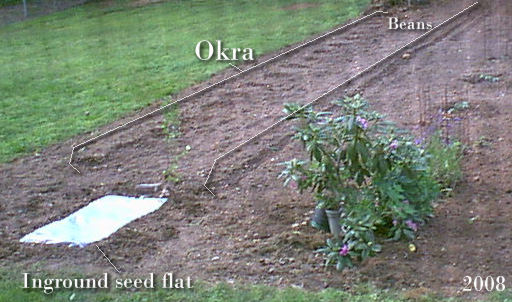
The seed nursery is what I have labeled as an in-ground seed flat. I did not have a real flat handy, I think I threw them out ages ago, but I did have a bag of potting soil. For the flat, I dug a rectangular impression into the soil around 3 inches deep. I filled it with the potting soil up to around 2 inches deep. (It was all that I had.) I soaked the potting soil because it was completely dry. I planted the seeds as one would normally plant in a flat, in tiny shallow rows around 3-4 inches apart. I labeled popsicle sticks and used them to mark the rows. Then I covered the seedbed with clear plastic. The plastic is around 2 inches above the seedbed. The edges of the plastic are buried to keep it from blowing away. The plastic will keep the potting soil moist and it will keep rain from washing away the tiny seeds.
My Homemade Okra Label

The okra seed that I used is 10 or more years old. I hope it sprouts. I soaked the okra seeds all day yesterday. I opened one of the seeds and it looked viable, but I could not really tell. The store where I bought the plants and seeds was sold out of okra. Just in case the okra does not sprout, I will look for okra seed when I look for more pepper plants at a different store.
This is how I planted the okra this year. With a garden hoe, dig holes around 12-18 inches apart (I prefer to have them at least 18 inches or more apart). The holes should be several inches deep. Fill the holes full with water. Pull the dirt back into the holes, tamping over the holes with the back of the hoe. Place 3-4 okra seeds on top of the dirt where each hole is. With your finger, push each seed into the damp dirt around an inch deep. Make sure the hole closes back up; it should because it is wet. After the seeds sprout, thin to one plant per hole.
Tomatoes
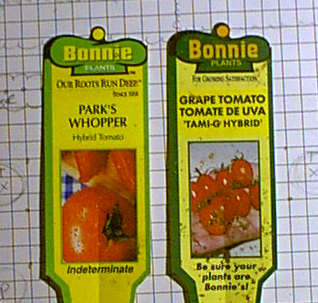 The tomato labels pictured show the two kinds I planted this year.
In a tomato, I prefer indeterminate. That means they grow long vines and should be caged. I use homemade cages. Our cages are made from concrete reinforcing wire. The cages are 5 feet tall and around 20 inches in diameter. Determinate tomatoes are bushy, but they still benefit from some support, at least stakes.
To plant tomato plants - dig a very deep hole. Fill the hole with water and let that drain a bit. Add more water to fill the hole around half way. Pick up your tomato plant and pinch off the leaves from the lower 2/3 of the stem. Place the tomato into the hole so that the uppermost leaves will be above ground. Fill in with dirt and enough water to settle the dirt. Tomatoes are planted deep like this because they will root all along the stem. Do not plant other vegetables like this because the stem will rot instead of root. Later, after the tomato plants have grown 6-8 inches above the ground, mulch around the plant. Tomatoes benefit from even moisture and mulch helps in that way.
Happy Gardening!
Read about the two different subscriptions available for DonnaYoung.org Some items are available for purchase from the Shopping Cart
Portfolio X - Generate a Homeschool Planner (rtf) with Class Names, Child's Name, Grade, and School Year
 Portfolio X - Use this to generate a Lesson Planner file [RTF] that is filed with your subjects and classes.
Calendars - 3-Month - WIDE
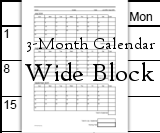 3-Months per page Calendars with wide blocks! These are similar to the 3-month ruled calendars, but I removed the ruled lines and stretched out the bocks.
K1 Manuscript Handwriting
 I've added 31 new files to the "Large Letters" manuscript handwriting page. Most of the new worksheets are in a new set called Set 3. Rule height is approximately 1 3/8".
Copyright © 1999 - 2024 Donna Young, All Rights Reserved
![]() RSS Feed ·
Terms of Use ·
Privacy Policy ·
FAQ's ·
Blog ·
Site Index
RSS Feed ·
Terms of Use ·
Privacy Policy ·
FAQ's ·
Blog ·
Site Index
Subscribe to DonnaYoung.org Update Feed by Email
You are at DonnaYoung.org, online since 1998. Thank you for visiting my website. Donna Young
Donna Young @ 2 May 2008