Using a Shopping List
Can be printed on the backs of misprints or used paper. The image links to a printable list. Other choices of shopping lists may be printed from the Kitchen page.
Suggestions for use:
 Usage 1. Hang from a key ring:
Supplies: Scissors, hole-punch,
key ring or paper clip  After printing, cut into 3 strips. Punch a hole in the top center of
each strip. Join the strips with a small key ring and hang in the
kitchen. Rig a pen or pencil to hang with the list.
After printing, cut into 3 strips. Punch a hole in the top center of
each strip. Join the strips with a small key ring and hang in the
kitchen. Rig a pen or pencil to hang with the list.
Usage 2. Glued List on a magnet:
Supplies: Rubber cement,
mesh from a onion bag or some other produce bag, scissors, two spring
clamps, card stock
After printing, cut the paper in half, then cut into 3 strips. Cut a
piece of heavy card the same size as the list (poster board weight at
least). Lay the strips together in a stack, trim the edges a bit to make
them neat, place the card on the back. With two spring clamps, clamp the
stack together near the top. Inspect the top edge to make sure most of
the pages are flush with each other. (see image below) Stand the list up
as shown in the image. Use rubber cement for the next step. Any brand
ought to work; I used Elmer's No-Wrinkle Rubber Cement. (note: read warning on rubber cement jar -- use only in well ventilated area)
 Apply the rubber cement: Holding the rubber cement brush
vertically and with most of the rubber cement wiped off, pound
lightly the rubber cement onto the top edges of the papers. Allow
to dry for about 5 minutes. Add another layer of rubber
cement. Cut a narrow band of mesh and when the rubber cement
becomes tacky, press the mesh into the glued edge.
Apply the rubber cement: Holding the rubber cement brush
vertically and with most of the rubber cement wiped off, pound
lightly the rubber cement onto the top edges of the papers. Allow
to dry for about 5 minutes. Add another layer of rubber
cement. Cut a narrow band of mesh and when the rubber cement
becomes tacky, press the mesh into the glued edge.
Build up the glue: With a little rubber cement on the brush, allow a thin stream to drizzle over the mesh. Let dry and repeat 3 or 4 more times. Trim the excess mesh from the edges with either scissors or nail clippers. *The amount of rubber cement you apply depends on the thickness of the pad of papers you are making. Thinner pads need less glue than thicker pads.
Glue on the magnet: With the rubber cement, glue a flat magnet to the top back page or the card if you placed on there.
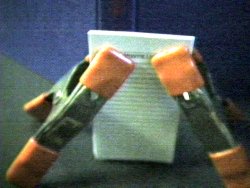
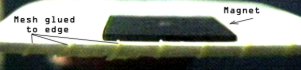 This image shows the top edge of the pad. You can see the magnet
that is glued to the back of the list. The mesh that is embedded
in the rubber cement is also visible.
This image shows the top edge of the pad. You can see the magnet
that is glued to the back of the list. The mesh that is embedded
in the rubber cement is also visible.
This doesn't make a wonderful refrigerator pad, it's rather just okay. I thought this was interesting to do at least once, but since pads with a magnet can be purchased for very little, I would prefer to do that; however Usage #1 is what I do.
That said.. for years I have used and continue to use method 1. I hung the key-ringed paper on a hook that was on a kitchen cabinet. I attached an ink pen to it. That worked very well. When we refinished the cabinets, I removed the hook and never put it back, and since then, I used a pad that has a magnet stuck to the back of it. That works well, but I am back to using the key ring method once more. I really do not like buying things when I can use scrap paper instead.
How I Use the Shopping List
For most items, when something is opened, put the item on the list. This keeps items in stock. Involve the family. Ask them to place what they need on the list. Tell them that they should place items on the list if they open something, such as a package of soap or a jar of spaghetti sauce. This method works well as long as it is followed, otherwise I will forget to pick up things at the store.
In summary, when a product is opened, put it on the list. This maintains the "stock."
Donna Young
 Lesson 1: Learning the Basics
 MM Medium - Handwriting lessons
 What?! A Handwriting Planner.. whaaaaat?