The Excel 6-Week Homeschool Planner
About the Planner
 The file requires a spreadsheet program such as Microsoft Excel or OpenOffice.
The planner file allows you to create 6 weekly dated planners and a dated
3-week objections list page. The planner can be personalized with up to 9
subjects and a planner title. To make the next 6 weeks, you do have to
either delete content or start with a fresh empty file to create the
planner for the next 6-weeks.
 Download the file and save it to your computer. On the Data page,
type information in the white cells. The information will be imported into
the 6 weekly planners and the Objectives & List worksheets. That is all you
need to do unless you want to do more.
Download the file and save it to your computer. On the Data page,
type information in the white cells. The information will be imported into
the 6 weekly planners and the Objectives & List worksheets. That is all you
need to do unless you want to do more.
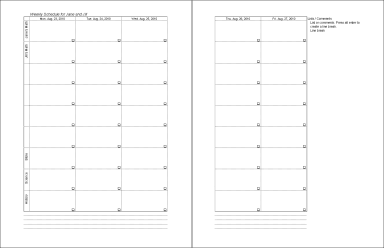
The 6-Week Planner also comes in the 2-page per week version. New as of today, August 12, 2010.
The Files
files updated 4/22/2013
 Download Excel Weekly Planner 1 page per week
Choose format ![]() - XLSX | XLS
- XLSX | XLS
Download Excel Weekly Planner 2 pages per week
Choose format - XLSX | XLS
Formats:
XLSX = MS Excel 2007+
XLS =
MS Excel 2003 and older (not checked with Excel 97)
How to Use the Planner
The planner is easy to use. Keep in mind that it is designed for two 3-week blocks of time [6-weeks]. To continue to use the planner, do one of two things:
1. [recommended] Start a New Planner.
2. [not recommended] Delete content from old planner and reuse it.
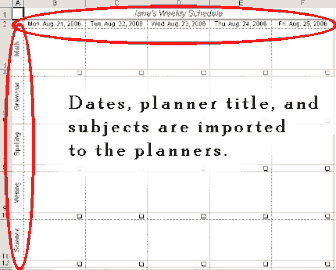
Enter Information in Data
On the worksheet with the Data tab, replace the sample information with your information. Type the child's name, the starting date, and the subjects.
The information that you type in Data will be imported into the 6 planners and the Objectives & List page.
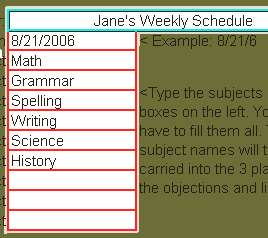
Image darkened to highlight the area which takes input.
Note: If you want to add plans to the planner before printing, the cells have been formatted to wrap.
 Note: The areas that do not allow typing are not meant to be typed in.
Typing in protected areas will ruin the file because it will overwrite the
code. If you choose to unprotect the sheet, please be careful not to type
in cells that have code.
Note: The areas that do not allow typing are not meant to be typed in.
Typing in protected areas will ruin the file because it will overwrite the
code. If you choose to unprotect the sheet, please be careful not to type
in cells that have code.
Objectives and List
This image shows the Objectives & List sheet. It is an optional sheet.
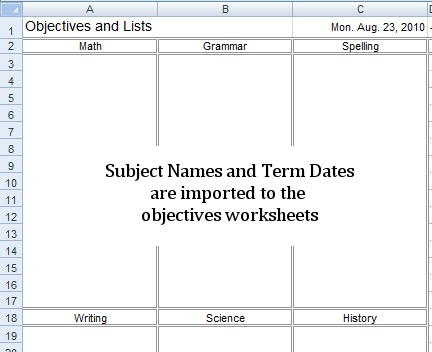
The purpose of the Objectives & List sheet is to have a place for jotting notes, lists, goals, or etc, for the 3-week period.
The name of the sheet can be changed to something else if you do not want to list Objectives.
In lists, you can copy and paste lists into the file as long as the list has a return after each item. The list is 47 lines long and around 20 characters wide I think.
Printing
Always check print preview before printing any Excel file
that I offer. I have the settings to print properly, but sometimes that
does not work well on other computers. Check it first.
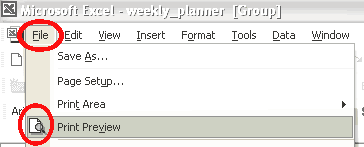
To open print preview, go to File > Print Preview
Look for the following in print preview: That each form is printing on one sheet each and how many pages are being printed.
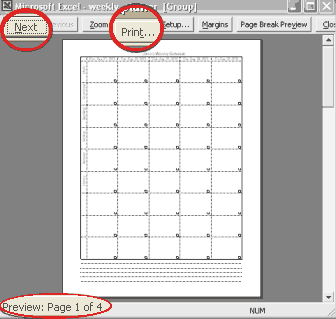
Print preview. If you have chosen to print more than one page, use Next to
look through all pages before printing.
If a single form uses more than one sheet of paper, either adjust the margins or adjust the cells of the form.
To print all 4 of the files at once, hold the ctrl key and select each of them (on the bottom tabs.)

Selected tabs shown are white. To select: hold the ctrl key and
select the ones you want. To unselect, do the same.
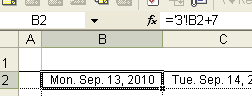
How To Skip a Week
Applies to files that were downloaded 8/13/2010 or later
If somewhere along the 6-week period, your family takes a week off, then you can "fix" the dates in this way.
1. Go to the sheet that has the "vacation" dates.
2. Unprotect the sheet.
3. Click on the first dated cell
4. Look in the formula bar-- see the +7
5. Change the +7 to + 14. [see images below]
6. Press enter.
7. Protect Sheet, have fun on your vacation.

Tips
When the six weeks is over, either replace data in current planner or start a new planner. If you have younger children who will follow about the same path, then it might be better save the old planners and to start a new planner for each 6-week period. Save your plans by backing up the planners to a storage device.
To dress up planner, unprotect the worksheets and add clip art. Be careful to not empty or overwrite coded cells.
To make line a 'return' in Microsoft Excel, use this keystroke combination: Alt enter.
To unprotect a sheet, go to: Tools > Protection >
Unprotect Sheet. Visit that menu again to protect the sheet.
Newer Excel: Review > Unprotect Sheet
Donna Young
June 28, 2006
Hello Visitor!
I am currently working on this website to add to its ginormousness. Thank you for visiting, and please subscribe yearly to access my many printable files! Donna Young
May 13, 2021

 "Manuscript Large"
 WOW! a Purse-Sized Calendar Booklet!
 The calendar frame